
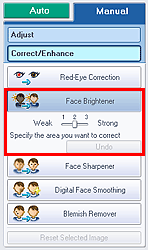
You can brighten dark faces caused by bright background.
 Note
NoteYou can brighten dark photos caused by bright background automatically by selecting Auto Photo Fix.
If the correction had not been made sufficiently, applying Face Brightener function is recommended.
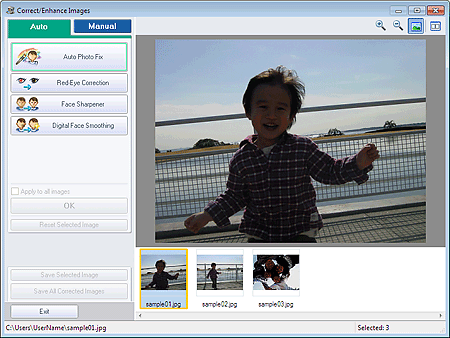
Select photos in the Select Images screen, then click  (Correct/Enhance Images).
The Correct/Enhance Images window appears.
 Note
NoteYou can also display the Correct/Enhance Images window by clicking (Correct/Enhance Images) in the Layout/Print or Edit screen. In that case, only the image displayed in Preview can be corrected/enhanced.
See "Correct/Enhance Images Window" for details on the Correct/Enhance Images window.
Select the image you want to correct from the thumbnail list in the Correct/Enhance Images window.
The image appears in Preview.
NoteIf only one image is selected, the thumbnail list does not appear below Preview.
Click Manual, then click Correct/Enhance.
Click Face Brightener.
 Note
NoteEffect levels can be changed using the slider below Face Brightener.
Move the cursor over the image. The shape of the cursor changes to ![]() (Cross).
(Cross).
Drag to select the area you want to correct, then click OK that appears over the image.
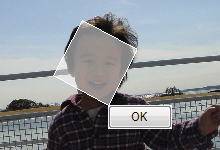
The entire image is corrected so that the selected area containing the face becomes brighter, and the ![]() (Correction/Enhancement) mark appears on the upper left of the image.
(Correction/Enhancement) mark appears on the upper left of the image.
NoteYou can also drag to rotate the selected area.
Click  (Compare) to display the images before and after the correction side by side so that you can compare and check the result.
Click Undo to undo the preceding correction operation.
Click Save Selected Image or Save All Corrected Images.
You can save corrected images as new files.
NoteTo save only the image you like, click Save Selected Image. To save all images, click Save All Corrected Images.
Only JPEG/Exif data format is available for corrected images.
Click Exit.
 Important
The corrections will be lost if you exit before saving corrected images.
