
Click Custom on the Custom Scan with One-click tab or in the One-click Mode screen to open the Custom dialog box.

Document Type
Select the type of document to be scanned. When Auto Mode is selected, the document type is automatically detected. In that case, Color Mode, Document Size and Resolution are automatically set as well.
 Important
Document types supported by Auto Mode are photos, postcards, business cards, magazines, newspapers, text documents, and BD/DVD/CD.
The following types of documents cannot be scanned correctly with Auto Mode. In that case, specify the document type or size.
- A4 size photos
- Text documents smaller than 2L (5 inches x 7 inches) (127 mm x 178 mm), such as paperback pages with the spine cut off
- Documents printed on thin white paper
- Long narrow documents such as panoramic photos
Reflective disc labels may not be scanned properly.
Place documents correctly according to the type of document to be scanned. Otherwise, documents may not be scanned correctly.
See "Placing Documents (When Scanning from a Computer)" for details on how to place documents.
 Note
NoteTo reduce moire, set Document Type to Magazine.
Color Mode
Select how to scan the document.
Document Size
Select the size of the document to be scanned.
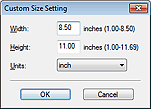
When you select Custom, a screen in which you can specify the document size appears. Select a Units, then enter the Width and Height and click OK.
 Important
When you select Auto Detect, the image may not be scanned at the correct position and size. In that case, change the size to the actual document size (A4, Letter, etc.) and align a corner of the document with the corner at the arrow (alignment mark) of the Platen.
Resolution
Select the resolution at which to scan documents.
Use the scanner driver
Select this checkbox to display the ScanGear (scanner driver) screen and make advanced scan settings.
Color Mode, Document Size, Resolution, and other settings in the Custom dialog box will be disabled. Specify these settings in the ScanGear screen.
Specify...
Opens the Scan Settings dialog box in which you can make advanced scan settings.
Automatically save the image to your computer after scanning it
Select this to save the images to your computer as specified after scanning them.
The File name, Save as type and Save in settings will be displayed.
File name
Enter the file name of the image to be saved (up to 64 characters). When saving multiple files, 4 digits are appended to each file name.
Save as type
Select a file type to save the scanned images.
Select Auto, JPEG/Exif, TIFF, or BMP. Auto is displayed when Document Type is Auto Mode.
ImportantWhen Auto is selected, the file format may differ depending on how you place the document.
See "Placing Documents (When Scanning from a Computer)" for details on how to place documents.
You cannot set passwords for PDF files.
You cannot select JPEG/Exif when Color Mode is Black and White.
NoteWhen Auto is selected, files are saved in the following formats according to the document type.
Photos, postcards, BD/DVD/CD, and business cards: JPEG
Magazines, newspapers, and text documents: PDF
You can change the file format from Set....
Images saved as PDF files may not open depending on the application. In that case, select an option other than Auto in Save as type.
If you select JPEG/Exif when Document Type is not Auto Mode, the Save the JPEG/Exif file in AdobeRGB checkbox will be selectable.
Set...
You can specify the file format in which to save images. Select a file format for items detected as documents, and for items detected as photos.
ImportantYou cannot select a compression type for JPEG files when the Compress scanned images when transferring checkbox is selected on the "General Tab" of the Preferences dialog box.
You can specify a compression type for JPEG files. Select High(Low Compression), Standard, or Low(High Compression).
ImportantThis setting is not available when the Compress scanned images when transferring checkbox is selected on the "General Tab" of the Preferences dialog box.
Save in
Displays the folder in which to save the scanned images. To change the folder, click Browse... to specify another one.
By default, the scanned images are saved in the following folders.
Windows 7: MP Navigator EX folder in My Pictures folder
Windows Vista: MP Navigator EX folder in Pictures folder
Windows XP: MP Navigator EX folder in My Pictures folder
Save to a Subfolder with Current Date
Select this checkbox to create a subfolder in the folder specified in Save in with the current date and save scanned files in it. A subfolder with a name such as "2011_01_01" (Year_Month_Date) will be created.
If this checkbox is not selected, files are saved directly in the folder specified in Save in.
Save the JPEG/Exif file in AdobeRGB
Select this checkbox to save the images in colors that correspond to Adobe RGB.
ImportantThis function is available only when Save as type is JPEG/Exif and Document Type is not Auto Mode.
This function is not available if the Adobe RGB profile is not installed.
NoteYou cannot select this setting if the Use the scanner driver checkbox is selected.
When you save an image with the Save the JPEG/Exif file in AdobeRGB checkbox selected, an underscore is added to the beginning of the file name. (Example: _Image0001.jpg)
Open the save dialog box after scanning the image (Input Exif information)
Select this to open the Save dialog box after scanning the images and specify the save settings such as destination folder, file name and Exif information.
Open with
Specify an application with which to open scanned images. Drag and drop the icon of an application that supports the file format displayed in Save as type. The specified application starts after images are scanned.
ImportantDepending on the specified application, the images may not appear correctly or the application may not start.
NoteFor further procedures, refer to the application's manual.
Reset
Cancels the application setting.
Set...
Allows you to select an application to start.
Start scanning by clicking the one-click button
Select this checkbox to start scanning when you click an icon in One-click Mode.
Apply
Saves and applies the specified settings.
Click Cancel instead of Apply to cancel the specified settings.
Cancel
Cancels the specified settings. The current screen closes.
Defaults
Returns all settings in the screen to their defaults.
Scan
Scans and saves documents with the specified settings.
When Save as type is Auto, a confirmation appears. Click Instructions to open this guide.
