In some of print menus in Advanced photo, you can change the method to display the photos saved on the memory card or USB flash drive and specify range of dates to select photos.
![]() Changing the Method to Display
Changing the Method to Display
![]() Specifying Range of Dates to Select Photo
Specifying Range of Dates to Select Photo
Changing the Method to Display
By pressing the left Function button on the photo selection screen, the screen to select a display method is displayed.
Use the 
 button to select the display method, then press the OK button.
 Note
Note-
The display method is retained even if other print menu is selected.
The following methods are selectable.
-
Standard view mode:
The photos are displayed one by one. To select the photo, use the

 button.
 -
List view mode:
Nine photos are displayed at a time. To select the photo, use the
button.Note-
In Select photo print of Photo, you can specify the number of copies for each photo you want to print by using the + or - button.
-
-
Skip mode:
You can skip the photo by the number of photos or the shooting date.
The following screen is displayed.
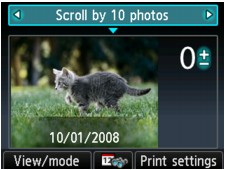
Use the
button to select a skip method.Use the
button or the OK button to move the cursor to the photo selection, then use the button to select the photo you want to print.To return to the skip method selection, use the
button.Note-
It may take a while for skipping the photos depending on the number of photos saved on the memory card/USB flash drive.
-
When Skip by date is selected as a skip method, the date is displayed according to the settings of Date display format in Device user settings under Device settings.
-
Specifying Range of Dates to Select Photo
By pressing the center Function button on the photo selection screen, the following screen is displayed.
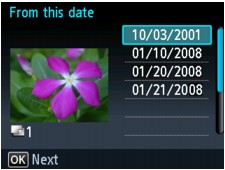
Use the button to select a start date, then press the OK button.
Next, use the button to select a end date, then press the OK button.
When the confirmation screen is displayed, press the OK button.
Note-
When Skip by date is selected as a skip method, the date is displayed according to the settings of Date display format in Device user settings under Device settings.
