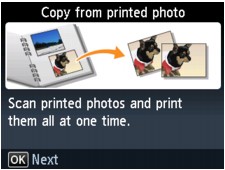
You can scan printed photos and copy them all at one time.
-
Make sure that the machine is turned on.
-
Load the photo paper on the rear tray.
-
Select
 Photo copy on the HOME screen.
 -
Confirm the on-screen instructions, then press the OK button.
-
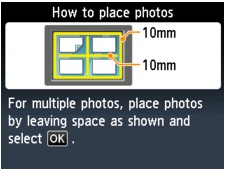
Load the printed photo on the platen glass following the on-screen instructions, then press the OK button.
 Note
Note-
For details on loading photos on the platen glass:
When scanning is finished, the print settings confirmation screen is displayed.
-
-
Specify the settings as necessary.
Use the

 button to change the setting item, and the
 button to change the setting, then use the OK button to confirm the selection.
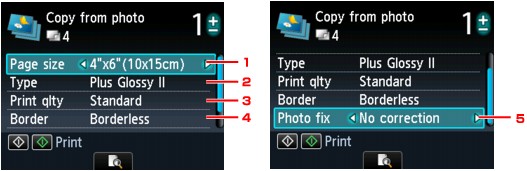 Note
Note-
Depending on the setting item, some settings cannot be specified in combination with the setting of other setting items. If the setting cannot be specified in combination is selected, Error details is displayed on the LCD. In this case, press the left Function button to confirm the message, then change the setting.
-
Page size
Select the page size of the loaded paper.
-
Type (Media type)
Select the media type of the loaded paper.
-
Print qlty (Print quality)
Select print quality according to the original.
-
Border (Bordered/Borderless print)
Select bordered or borderless print.
-
Photo fix
Select whether the machine corrects the scanned image automatically.
Select No correction, Auto photo fix, or Fade restoration.
Note-
When No correction is selected, the machine prints the scanned image without correction.
-
When Auto photo fix is selected, the machine corrects the scanned image automatically.
-
When Fade restoration is selected, the machine corrects the scanned image that have faded over time.
-
-
-
Specify the number of copies by using the + or - button.
Note-
By pressing the center Function button, you can preview an image of the printout on the preview screen. On the preview screen, use the
button to change the scanned photo.If
 appears on the photo, the printed photo may not be scanned properly. Load the photo on the platen glass properly, then rescan the printed photo.
-
-
Press the Color button for color printing, or the Black button for black & white printing.
The machine starts printing.
Note-
If the printed photo was not scanned properly, the confirmation screen asking you if you continue printing is displayed. By selecting Yes, the machine starts printing. If you rescan the photo, select No and scan the photo again.
-
