
You can trim the scanned image using MP Navigator EX. "Trimming" is the act of selecting the area you want to keep in a photo and discarding the rest.
Select the image you want to trim in the Scan/Import or Correct/Enhance Images window and click  (Trimming) on the Toolbar to open the Crop window.
 Note
NoteSee "Let's Try Scanning" to scan images into MP Navigator EX.
You can also select images saved on a memory card or computer.
To open the Correct/Enhance Images window, click  (Image Correction/Enhancement) in the View & Use window or click Edit/Convert in Image Handling Buttons, then click Fix photo images on the list.
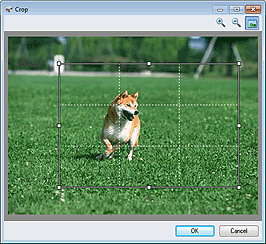
In the displayed window, drag the white frame to adjust the trimming area, then click OK.
NoteThe buttons displayed on the Toolbar vary by view.
Drag the sides or corners of the white frame to expand or contract the trimming area. To move the trimming area, place the cursor within the white frame and drag it.
Place the main subjects along the broken white lines or at the intersections to create a balanced image.
When you trim a saved image, a new image is created.
