
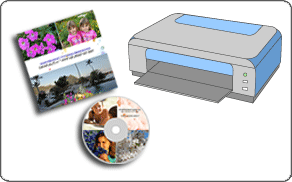
You can print your own disc labels and case covers using your favorite photos.
 Important
Do not set the disc tray until a message prompting you to load a printable disc appears. Loading a printable disc while the machine is operating may damage the machine.
Start Easy-PhotoPrint EX.
Click Disc Label/Case Cover from Menu.
The Page Setup screen appears.
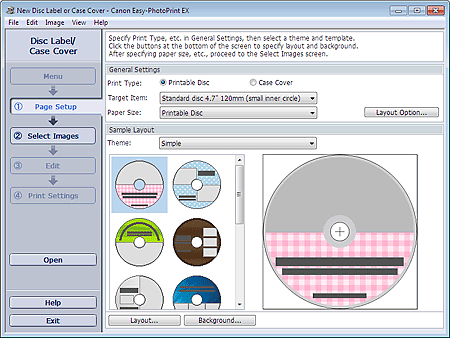
Set Print Type, Target Item or Paper Size, etc. in the General Settings section.
 Note
NoteSee Help on the target item and paper size that can be selected.
In the Layout Option dialog box, you can select whether to place all the inserted images on one page or to determine the number of pages automatically according to the number of inserted images. To display the Layout Option dialog box, click Layout Option....
Select the theme and the layout you want to use from Theme in Sample Layout.
If you want to change the layout, click Layout....
The Change Layout dialog box appears.
NoteThe layouts that can be selected may vary depending on the Print Type or Target Item.
If you want to change the background, click Background....
The Change Background dialog box appears.
In the Change Background dialog box, you can paint the background in a single color or paste an image file to it.
Click Select Images in the step button area on the left side of the screen.
The Select Images screen appears.
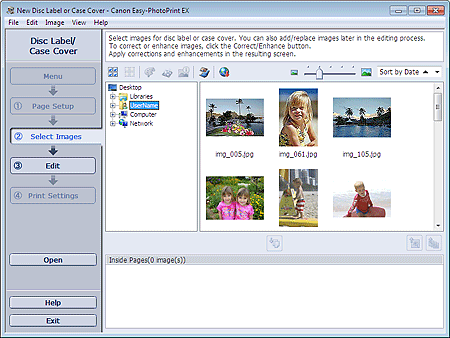
Select the folder that contains the image you want to print from the Folder Tree area.
The images in the folder will be displayed as thumbnails (miniatures).
ImportantIf Easy-PhotoPrint EX is started from another application (MP Navigator EX), the Folder Tree area will not be displayed.
The images selected in MP Navigator EX will be displayed as thumbnails.
NoteYou can also use still images captured from videos.
You can also use images downloaded from photo sharing sites on the Internet.
Select the image(s) you want to print, and click  (Import to Inside Pages).
The selected image(s) is (are) displayed in the selected image area.
You can also select the image(s) you want to print by dragging it (them) into the selected image area.
NoteTo delete an image in the selected image area, select the image you want to delete and click  (Delete Imported Image).
To delete all images from the selected image area, click  (Delete All Imported Images).
Click Edit in the step button area on the left side of the screen.
The Edit screen appears.

Edit your disc label/case cover if necessary.
ImportantThe edit information will be discarded if you exit Easy-PhotoPrint EX without saving the edited disc label/case cover. It is recommended that you save the item if you want to edit it again.
NoteWhen Printable Disc is selected for Print Type in the Page Setup screen,  (Adjust Print Area) appears. In the Adjust Print Area dialog box that appears by clicking it, you can adjust the print area of disc label to print.
Click Print Settings in the step button area on the left side of the screen.
The Print Settings screen appears.
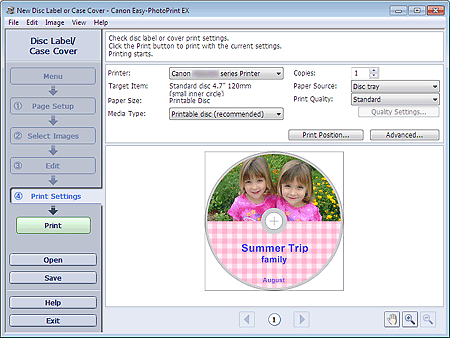
Set Media Type, Paper Source, etc. according to the printer and paper to be used.
NoteWhen Printable Disc is selected for Print Type in the Page Setup screen, only Disc tray will be selectable for Paper Source.
When Printable Disc is selected for Print Type in the Page Setup screen, Print Position... appears. In the Adjust Print Position dialog box that appears by clicking it, you can adjust the print position on the disc label.
The media types may vary depending on the printer and the print type.
The paper sources may vary depending on the printer and the media type.
You can set a custom print quality level in the Print Quality Settings dialog box. To display the Print Quality Settings dialog box, select Custom for Print Quality and click Quality Settings....
You can specify the print range in the Print Settings dialog box. To display the Print Settings dialog box, click Advanced....
Click Print in the step button area on the left side of the screen.
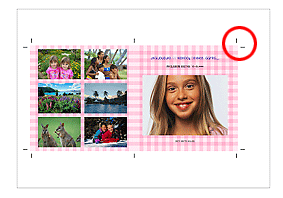
NoteWhen Case Cover is selected for Print Type in the Page Setup screen, crop marks (reference lines for trimming the image to its final size) are printed on the four corners of the print area. After printing, trim along the crop marks.
Crop marks may not be printed depending on the selected target item and paper size.
You can correct or enhance the selected image before printing.
See Help for details on each screen.

