Click  (Image Correction/Enhancement) in the View & Use window or click Edit/Convert in Image Handling Buttons, then click Fix photo images on the list to open the Correct/Enhance Images window.
In the Correct/Enhance Images window, you can make advanced settings including image correction/enhancement and brightness/contrast adjustment.
You can also display the source image and corrected image side by side for comparison.
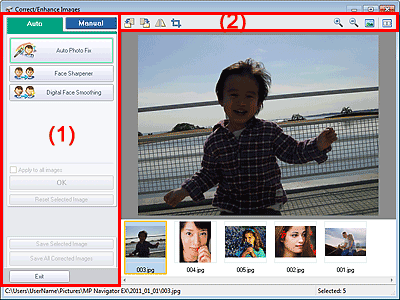
(1) Task Area
(2) Toolbar
 Important
Image correction/enhancement cannot be applied to PDF files or black and white binary files.
 Note
NoteThe Correct/Enhance Images window can also be opened by clicking (Image Correction/Enhancement) in the Zoom in window.
It may take a while to correct large images.
See "View & Use Window" for details on the View & Use window.
Available tasks and settings vary between the Auto and Manual tabs.
Click the Auto or Manual tab to display the corresponding tab.
Use the functions in the Auto tab to apply corrections and enhancements to the entire image.
See "Correcting/Enhancing Images Automatically" for details.
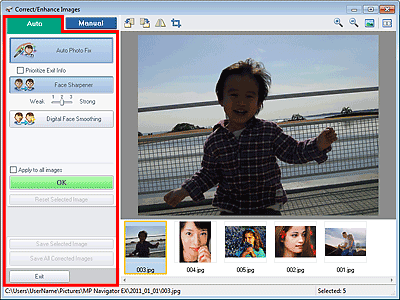
Auto Photo Fix
Applies automatic corrections suitable for photos.
Prioritize Exif Info
Select this checkbox to apply corrections primarily based on the settings made at the time of shooting.
Deselect this checkbox to apply corrections based on the image analysis results. It is recommended that you normally select this setting.
Note"Exif" is a standard format for embedding various shooting data in digital camera images (JPEG).
Face Sharpener
Sharpens out-of-focus faces.
You can adjust the effect level using the slider.
Digital Face Smoothing
Enhances skin beautifully by reducing blemishes and wrinkles.
You can adjust the effect level using the slider.
Apply to all images
Automatically corrects/enhances all images displayed in the thumbnail list.
OK
Applies the selected effect to the selected image or all images.
Reset Selected Image
Cancels all corrections and enhancements applied to the selected image.
Save Selected Image
Saves the corrected/enhanced image (the selected one).
Save All Corrected Images
Saves all the corrected/enhanced images displayed in the thumbnail list.
Exit
Closes the Correct/Enhance Images window.
There are two menus on the Manual tab: Adjust and Correct/Enhance.
Use Adjust to adjust brightness and contrast, or to sharpen the entire image.
Use Correct/Enhance to correct/enhance specific areas.
See "Correcting/Enhancing Images Manually" for details.
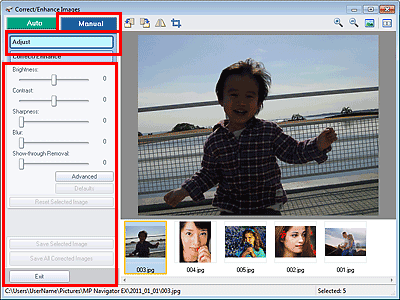
Brightness
Adjusts the overall image brightness.
Move the slider to the left to darken and right to brighten the image.
Contrast
Adjusts the contrast of the image. Adjust the contrast when the image is flat due to lack of contrast.
Move the slider to the left to decrease and right to increase the contrast of the image.
Sharpness
Emphasizes the outline of the subjects to sharpen the image. Adjust the sharpness when the photo is out of focus or text is blurred.
Move the slider to the right to sharpen the image.
Blur
Blurs the outline of the subjects to soften the image.
Move the slider to the right to soften the image.
Show-through Removal
Removes show-through of text from the reverse side or removes the base color. Adjust the show-through level to prevent text on the reverse side of thin document or the base color of the document from appearing on the image.
Move the slider to the right to increase the show-through removal effect.
Opens the Advanced Adjustment dialog box in which you can make fine adjustments to the image brightness and color tone.
For Brightness/Contrast and Tone, select a color in Channel to adjust either Red, Green, or Blue, or select Master to adjust three colors together.
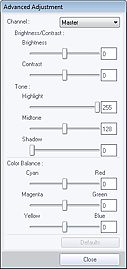
Brightness/Contrast
Adjust the brightness and contrast of the image.
Move the Brightness slider to the left to darken and right to brighten the image.
Move the Contrast slider to the left to decrease and right to increase the contrast of the image.
Tone
Adjust the brightness balance by specifying Highlight (the brightest level), Shadow (the darkest level) and Midtone (the color in the middle of Highlight and Shadow).
Move the Highlight slider to the left to brighten the image.
Move the Midtone slider to the left to brighten and right to darken the image.
Move the Shadow slider to the right to darken the image.
Color Balance
Adjust the vividness and color tone of the image.
Move the Color Balance slider to the left or right to emphasize the corresponding color.
NoteThese are complementary color pairs (each pair produces a shade of gray when mixed). You can reproduce the natural colors of the scene by reducing the cast color and increasing the complementary color. "Colorcast" is a phenomenon where a specific color affects the entire picture due to the weather or ambient strong colors.
It is usually difficult to correct the image completely by adjusting only one color pair. It is recommended that you find a portion in the image where it should be white, and adjust all three color pairs so that the portion turns white.
Defaults
Resets all adjustments.
Close
Closes the Advanced Adjustment dialog box.
NoteThe Brightness and Contrast values set in Adjust do not change even if the brightness and color tone are adjusted in the Advanced Adjustment dialog box.
Defaults
Resets each adjustment (brightness, contrast, sharpness, blur, and show-through removal).
Reset Selected Image
Cancels all corrections, enhancements, and adjustments applied to the selected image.
Save Selected Image
Saves the corrected/enhanced/adjusted image (the selected one).
Save All Corrected Images
Saves all the corrected/enhanced/adjusted images displayed in the thumbnail list.
Exit
Closes the Correct/Enhance Images window.
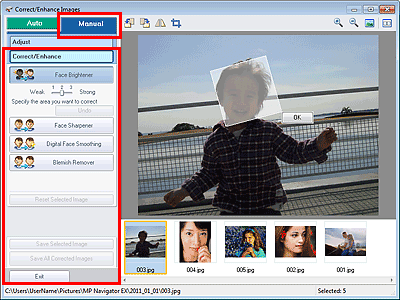
Face Brightener
Corrects the entire image to brighten the facial area in and around the selected area.
You can adjust the effect level using the slider.
Face Sharpener
Corrects the entire image to sharpen the facial area in and around the selected area.
You can adjust the effect level using the slider.
Digital Face Smoothing
Enhances skin beautifully by reducing blemishes and wrinkles in the selected area.
You can adjust the effect level using the slider.
Blemish Remover
Reduces moles in the selected area.
OK
Applies the selected effect to the specified area.
Undo
Cancels the latest correction/enhancement.
Reset Selected Image
Cancels all corrections, enhancements, and adjustments applied to the selected image.
Save Selected Image
Saves the corrected/enhanced/adjusted image (the selected one).
Save All Corrected Images
Saves all the corrected/enhanced/adjusted images displayed in the thumbnail list.
Exit
Closes the Correct/Enhance Images window.
Toolbar
 (Rotate Left)
Rotates the image 90 degrees counter-clockwise.
 (Rotate Right)
Rotates the image 90 degrees clockwise.
 (Invert)
Inverts the image horizontally.
 (Trimming)
Click this button to open the Crop window and specify the trimming frame.
 (Enlarge)
Enlarges the displayed image.
 (Reduce)
Reduces the displayed image.
 (Full-screen)
Displays the entire image in Preview.
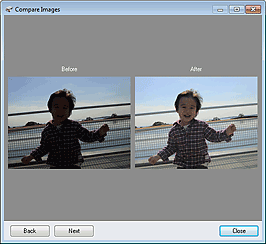
 (Compare)
Displays the Compare Images window. You can compare the images before and after the correction/enhancement/adjustment side by side.
The image before the correction/enhancement/adjustment is displayed on the left, and the image after the correction/enhancement/adjustment is displayed on the right.