You can view each photo from the memory card or USB flash drive on the LCD and print the desired photo.
You can also specify the number of copies for each photo and add the print job.
-
Make sure that the machine is turned on.
-
Load photo paper in the rear tray.
-
Select
 Advanced photo on the HOME screen.
 -
Insert the memory card into the card slot or insert the USB flash drive into the direct print port.
 Important
-
You cannot use the memory card and USB flash drive at the same time.
 Note
Note-
If you insert the memory card/USB flash drive before you select Advanced photo on the HOME screen, the photo selection screen in Photo is displayed.
If both photo files and PDF files are saved on the memory card/USB flash drive, the confirmation screen to select which file you print is displayed.
To display the HOME screen, press the HOME button.
-
-
Select
 Select photo print, then press the OK button.
The photo selection screen is displayed.
Note-
If no printable photo data is saved on the memory card/USB flash drive, Data of supported types are not saved. is displayed on the LCD.
-
If more than 2,000 photo data are saved on the memory card/USB flash drive, the photo data is split by group per 2,000 photos in reverse chronological order (date last modified) automatically. Check the message displayed on the LCD, then press the OK button.
-
-
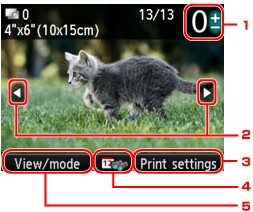
Specify the settings as necessary.
-
Number of copies
Specify by using the + or - button.
-
Selection photo
Select the photo you want to print by using the

 button.
 -
Print settings
By pressing the right Function button, the print settings confirmation screen is displayed.
On the print settings confirmation screen, you can change the settings of page size, media type, and print quality and so on.
-
Date specification
By pressing the center Function button, you can specify range of dates to select photo.
-
View/mode
By pressing the left Function button, you can change the display mode.
Note-
If you specify the number of copies for each photo, use the
button to display the photo you want to print and use the + or - button to specify the number of copies when the desired photo is displayed. -
You can also display the screen to specify the number of copies by pressing the OK button when the desired photo is displayed. When the screen to specify the number of copies is displayed, specify the number of copies by using the + or - buttons. Press the OK button to display the photo selection screen.
-
-
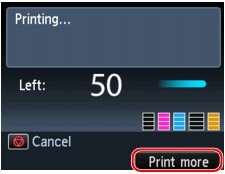
Press the Color button.
The machine starts printing.
Note-
To cancel printing, press the Stop button.
-
You can add the print job by pressing the right Function button while printing.
-
Adding the Print Job
You can display photo selection screen again and add the print job (Reserve photo print) while printing photos.
-
Press the right Function button when the print progress screen is displayed.
The photo selection screen is displayed.
Note-
While the photo selection screen is displayed, the machine prints the reserved photos.
-
-
Select the photo you want to print and specify the number of copies for each photo.
Note-
The
 reserved photo icon appears on the photo included in the print job.
-
-
Press the Color button.
The reserved photo is printed next to the photo that has already been started printing.
If you want to print more photos, operate from step 1 again.
Note-
While processing the print job, you cannot display the HOME screen, change the print menu, or print from the computer or other devices.
-
While processing the print job, the photo in other group is not selected.
-
While processing the print job, you cannot change the setting for Page size or Type on print settings confirmation screen. The setting is the same as the setting for the photo included in the print job.
-
If you press the Stop button, select Cancel all reservations, then press the OK button, you can cancel printing all photos. If you press the Stop button, select Cancel the last reservation, then press the OK button, you can cancel the last printing job.
-
If there are many print jobs, Cannot reserve more print jobs. Please wait a while and redo the operation. may be displayed on the LCD. In this case, wait a while, then add the print job.
